It seems that 2014 has been the "Year of Rustic." You see it everywhere, from home décor to wedding details. The quaint, weather-worn look is in. To add a rustic detail to your life, read on.
Difficulty level: Tedious, but not too complex
Cost: About 25 dollars, but could be cheaper with some effort.
Time: About two hours crafting, overnight drying
Got Space?: Can easily be done in a small room
Materials:
For the window pane:
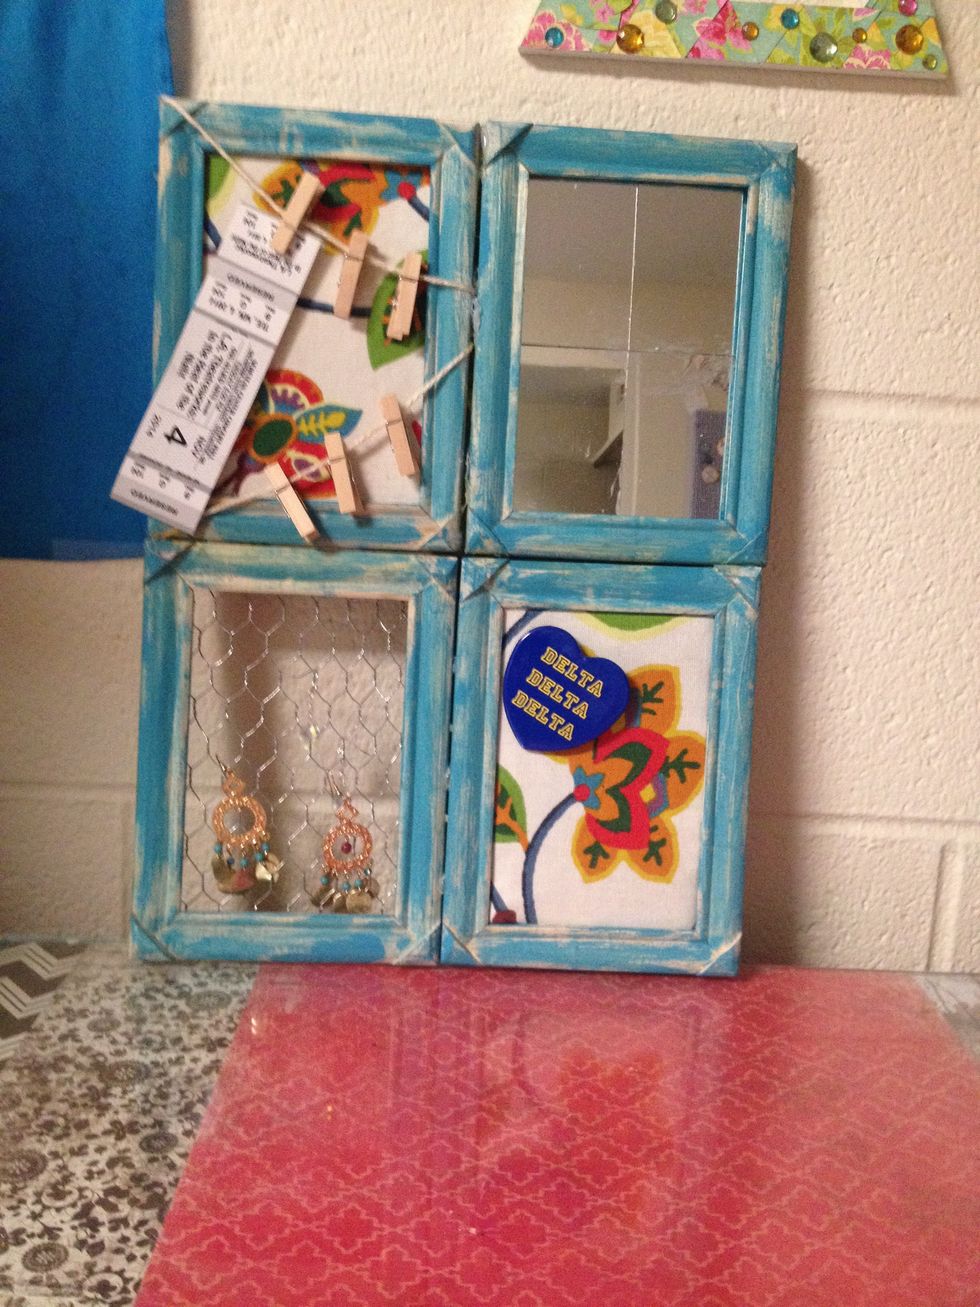
-Four 4-by-6 frames of the same style (can use larger frames if you desire)
-2 oz bottle of paint
-Paintbrush (a sponge is not recommended)
-Wood glue
-Hot glue
-Scissors
For the mirror frame:
-Mirror that will fit in frame (I chose to use four small mirrors and it resulted in a distorted reflection; consider using one even if it’s smaller)
-Optional decorations for around the mirror (doilies could be great)
For the clothespin frame:
-Miniature clothespins
-Some type of string
-Fabric (felt or bandannas are cheap options for this)
For the chicken wire frame:
-Chicken wire (small sheets can be purchased at Hobby Lobby)
For the fabric frame:
-Fabric
-Batting (I used felt to add cushion, but something like quilting batting would be more ideal)
Additional ideas for frames: Chalkboard, cork board, dry erase, quotes, pictures, a clock, and anything else you can think of. Get creative!
How to:
1) Before putting the frames together, you want to create each individual piece.
2) Paint all the frames. To achieve the weathered look, I simply brushed on very little paint at a time and spread it out. I also scratched off some of the paint with my fingernail. If you would like a less rustic look, paint the whole thing.
3) We’ll start with the chicken wire frame. Cut chicken wire to the correct dimension of your frame. It should be a little larger than the inner section, but not larger than the actual frame.
4) Hot glue this onto the frame. You might have to hold the chicken wire down in the frame to get the correct contact, but let it chill for a few seconds so you don’t burn your finger off!
5) Now the fabric frame. Cut pieces of the batting so that they are the exact size of the inner panel. I used three pieces of felt and it’s not thick enough for push pins, but will work for buttons, so you might want to add more. Hot glue them down, only on the edges.
6) Cut the fabric piece so that it can wrap around the edge of the panel. Hot glue this down and put the panel back in the frame. Done!
7) Mirror frame: I chose to use four 2 by 3 mirrors, but they distort the reflection so it’s not necessarily recommended. I also used wood glue to attach these to the panels, however it resulted in glue on the mirrors. You might want to try hot glue instead. Put the panel back in the frame when mirrors are dry.
8) Clothespin frame: This one is my favorite! Wrap a large piece of fabric around the panel, like you did with the fabric frame. Then put the panel back in the frame.
9) Starting on the back of the frame, hot glue a piece of string down. Zig-zag it across the front of your frame, tacking at each turning point. Add mini clothespins!
10) Now it’s time to put the whole thing together. Attach two frames to each other at a time by adding wood glue to the connecting side. You can also reinforce this with hot glue. Try to keep this as straight and flat as possible (putting a heavy textbook on top can help). Once the two sections have dried use wood glue to attach them to each other, you’re definitely going to need heavy textbooks (finally a use for those books!) to keep this together. Go ahead and let it dry overnight.
11) (Optional) I cut a piece of cardboard the size of my three, not chicken-wire frames and wood glued it to the entire back. You could also reinforce the back by taking thin, balsa wood and creating a cross on the seams.
This will make a great gift for the holidays. You can even put cute photos of you and the gift receiver in the clothespins, about wallet size would be perfect. Or you can keep it! Treat yo self.