
At any time, a resource owner can change or remove the rights granted to a given client by using OAuth.
What's the deal with OAuth?
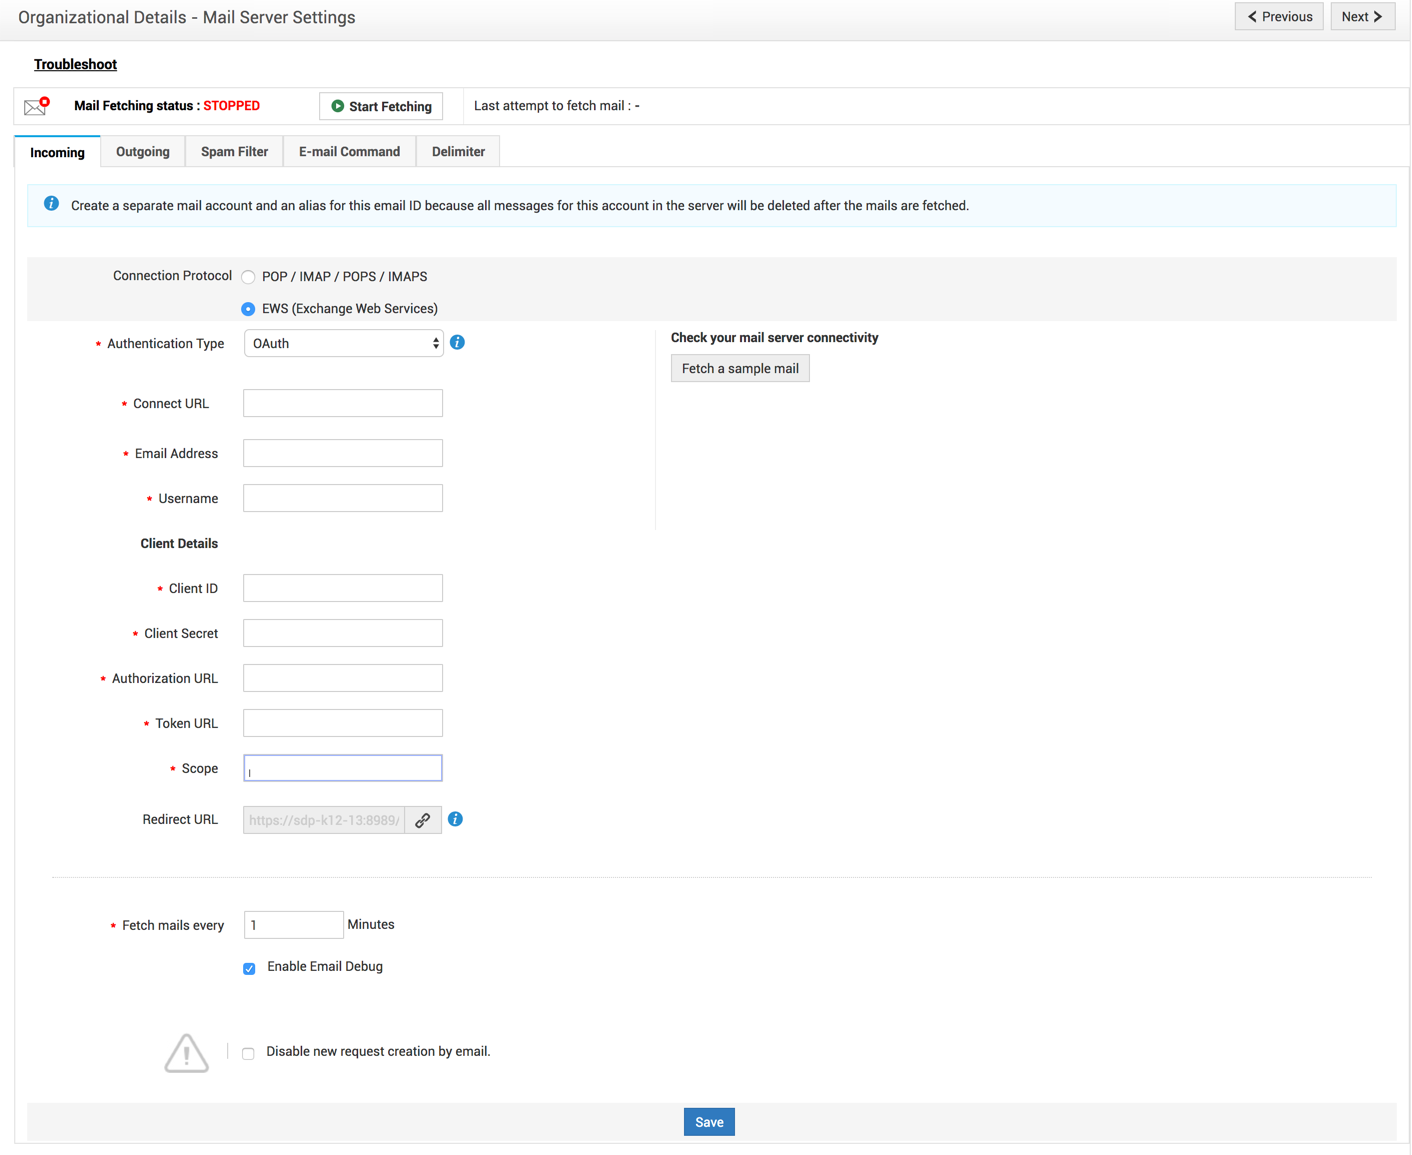
As part of OAuth Configuration, these entities must be included:
The user who has access to the protected resource is known as the resource owner.
Access is requested by an end-user or application.
The server that generates the client's access token with the permission of the resource owner is known as the authorization server.
The server that hosts the protected resource is known as a resource server.
It is the client's responsibility to receive an authorization permit from the resource owner and deliver it to an authorization server in order to access a protected resource. As long as the resource owner has given their approval, the authorization server generates an access token. The resource server hosts a protected resource that can only be accessed by the client with this token.
The following diagram illustrates how OAuth authentication works:
This is an example of ServiceDesk Plus acting as the resource owner's client and seeking access to the mail server.
- Make a decision on the type of connection.
- The server name or IP address of the mail server must be entered in the OAuth Authentication Type field if you select POP/IMAP/POPS/IMAPS.
- The connected mailbox's username and email addresses must be entered.
- The protocol is IMAPS and cannot be modified because only IMAPS supports OAuth authentication.
- Auto-selecting the correct port will be done for you. If necessary, you can alter the port.
- Email retrieval for EWS and Java Mail API has been tested in conjunction with Gsuite via Azure and Azure Web Services.
Emails will be retrieved at this period (in minutes).
If necessary, turn on Email Debug using the checkbox. This is used to investigate issues with email retrieval and delivery.
Incoming emails will not be added as new requests if you select the Disable new request creation by email option.
Save your work. It appears that the mail server's user consent window has been opened.
To access the user consent window, please make sure your browser is not blocking pop-ups or redirection.
If you're prompted, enter your username and password and then click "I agree."
Once the connection is secure, a message of congratulations appears.
The OAuth-authenticated mail server can now be accessed by the application.
Setting up your incoming mail server
OAuth configuration for incoming mail is straightforward.
Go to Admin >> Helpdesk >> Email Server Settings >> Outbound.
Selecting SMTP/SMTPS as your method of sending mail:
Enter the Server Name/IP Address and the Alternate Server Name/IP Address in the OAuth Authentication Type field.
Please include the sender's name and the email address in your message.
Enter the connected mailbox's Username and select the Protocol from the drop-down menu.
If necessary, enable TLS.

 women in street dancing
Photo by
women in street dancing
Photo by  man and woman standing in front of louver door
Photo by
man and woman standing in front of louver door
Photo by  man in black t-shirt holding coca cola bottle
Photo by
man in black t-shirt holding coca cola bottle
Photo by  red and white coca cola signage
Photo by
red and white coca cola signage
Photo by  man holding luggage photo
Photo by
man holding luggage photo
Photo by  topless boy in blue denim jeans riding red bicycle during daytime
Photo by
topless boy in blue denim jeans riding red bicycle during daytime
Photo by  trust spelled with wooden letter blocks on a table
Photo by
trust spelled with wooden letter blocks on a table
Photo by  Everyone is Welcome signage
Photo by
Everyone is Welcome signage
Photo by  man with cap and background with red and pink wall l
Photo by
man with cap and background with red and pink wall l
Photo by  difficult roads lead to beautiful destinations desk decor
Photo by
difficult roads lead to beautiful destinations desk decor
Photo by  photography of woman pointing her finger near an man
Photo by
photography of woman pointing her finger near an man
Photo by  closeup photography of woman smiling
Photo by
closeup photography of woman smiling
Photo by  a man doing a trick on a skateboard
Photo by
a man doing a trick on a skateboard
Photo by  two men
  running man on bridge
Photo by
running man on bridge
Photo by  orange white and black bag
Photo by
orange white and black bag
Photo by  girl sitting on gray rocks
Photo by
girl sitting on gray rocks
Photo by  assorted-color painted wall with painting materials
Photo by
assorted-color painted wall with painting materials
Photo by  three women sitting on brown wooden bench
Photo by
three women sitting on brown wooden bench
Photo by 
 Photo by
  Photo by
  Photo by
  Photo by

 people sitting on chair in front of computer


 all stars lol GIF by Lifetime
 two women talking while looking at laptop computerPhoto by
  shallow focus photography of two boys doing wacky facesPhoto by
  happy birthday balloons with happy birthday textPhoto by
  itty-bitty living space." | The Genie shows Aladdin how… | Flickr
 shallow focus photography of dog and catPhoto by
  yellow Volkswagen van on roadPhoto by
  orange i have a crush on you neon light signagePhoto by
  5 Tattoos Artist That Will Make You Want A Tattoo
 woman biting pencil while sitting on chair in front of computer during daytimePhoto by
  a scrabbled wooden block spelling the word prizePhoto by
 StableDiffusion
 StableDiffusion
 StableDiffusion


