Whether or not you have a special someone this Valentine's Day or not, the holiday is a perfect excuse to get all dolled up and go out somewhere.
I have been loving the Sweet Peach Eye Shadow Palette by Too Faced, which has inspired this Valentine's Day makeup look. The palette has many pinky shades that made me think of Valentine's Day.
So, let's get ready for a beautiful night out!
Step 1: Moisturizer

First thing, prepare your skin with a moisturizer before applying your makeup. One of my favorite moisturizers is Clinque Moisture Surge Overnight Mask. Even though it says to be applied at night, I like to use it during the day because it helps my makeup look velvety rather than cakey. Then, I apply the Tarte Rainforest of the Sea Drink of H2O Hydrating Boost Moisturizer to any extra dry patches on my face to smooth out those areas. Remember, your skin needs hydration for a smooth surface to apply makeup.
Step 2: Foundation

The foundation I love during the wintertime is the Too Faced Born This Way Foundation in the color Pearl. I apply it with a Bobbi Brown full coverage foundation brush and blend my heart away until I get that perfect satin finish.
Step 3: Primer

To help make eyeshadow last even longer, add a primer to your routine. My favorite is the Too Faced Shadow Insurance Eye Primer and I use it all over my lid.
Step 4: Eyeshadow

The first shade I use from the Too Faced Sweet Peach Palette is White Peach (first row, first shade), which is a matte vanilla white, from my crease up onto my brow bone with a Real Techniques Base Shadow Brush. Next, using a Real Techniques Crease Brush, I apply Candied Peach (second row, third shade), a coral shade with a violet shimmer, throughout my crease. Then, I use my bareMinerals Tapered Eyeshadow brush to apply Georgia (third row, second shade), a matte peachy light pink, to the inner third of my eyelid to help brighten up my eyes. Using the same brush, I then apply Just Peachy (first row, third shade), a shimmering peachy pink, to the outer third of my eyelid. Finally still using my bareMinerals brush, I apply Bellini (second row, fourth shade), a gilded peach, to the center of my eyelid.
Step 5: Eyeliner

For my eyeliner, I fancy a bright pop of color to go along with the bright pinks from the eyeshadows. So, along my top lash line I used the Colour Pop Créme Gel Pencil in the color Piggy Bank, a bright violet color.
Step 6: Mascara
 I love using two mascaras. On my top lashes, I use the Urban Decay Perversion Mascara. This mascara makes your lashes intensely black with no clumps, giving you a very fluttery eye look. On my bottom lashes, I apply the Clinque Bottom Lash Mascara. The Bottom Lash Mascara has a tiny brush perfect for separating the bottom lashes. It also has a special formula to prevent against the mascara running down your face, as your eyes get watery throughout the day.
Step 7: Concealer

The concealer I use is the Sephora brand Bright Future Concealer. I apply this under my eyes in a V formation to 1) hide my eye bags and 2) get that famous Kardashian glow under the eyes. To blend this all in, I use a MAC 286 brush. If I have any blemishes on my face, I will also cover them up with the same concealer and blend with the same brush.
Step 8: Contour

When I contour my face, I generally use a bronzer. For this look, I chose the MAC Bronzing Powder in the shade Matte Bronze. I find that the Matte bronzing powders are the easiest shades to use when I contour. I use a Bobbi Brown Face Blender brush to color where my cheeks get sucked in, my jaw, temples, and forehead. Then, on the tops of my cheekbones I used the Colour Pop Super Shock Highlighter in the color Churro. I apply it in small dots using one of my fingers then I blend it in with a Real Techniques Bold Metal 301 Flat Contour brush. This highlighter warms the face and adds a touch of a bronzy goddess glow.
Step 9: Blush & Highlight

I swear Nars has some of the greatest cheek products on the market for makeup, especially blush. Since I used a lot of pink on my eyes, I went with Luster (second row, first shade) to keep with the peachier, warmer tones. I applied this to the apples of my cheeks using a bella j. blush brush. Then, because you can never have too much highlighter, I also decided to use the highlighter from this palette, Albatross, which gives a bright, sparkly glow to the face. Using my Real Techniques Bold Metal 301 Flat Contour brush, I applied this to the bridge of my nose, a little to my forehead at the space right above the eyebrows, and to the indent above my lips.
Step 10: Eyebrows

For my eyebrows, I used my Tanya Burr Perfect Brows Palette. Using my Real Techniques Eyebrow brush, I mixed the shades Chestnut and Hot Cocoa (bottom two shades) then brushed the powder through my eyebrows. This kit makes my eyebrows look very full and natural. I then used (you guessed it) more highlighter. The highlighter I used is Fairy Cake (top left corner). Using my pinky finger, I applied and blended it to my brow bone.
Step 11: Lips

Whenever I do my makeup, I always leave my lips till last because they make the entire look complete. For lipstick, I used the MAC matte Nouvelle Vogue, a pink nude. Then over top on the center of my lips, I used MAC Dazzleglass in the color Steppin' Out, a sparkly pink gloss.
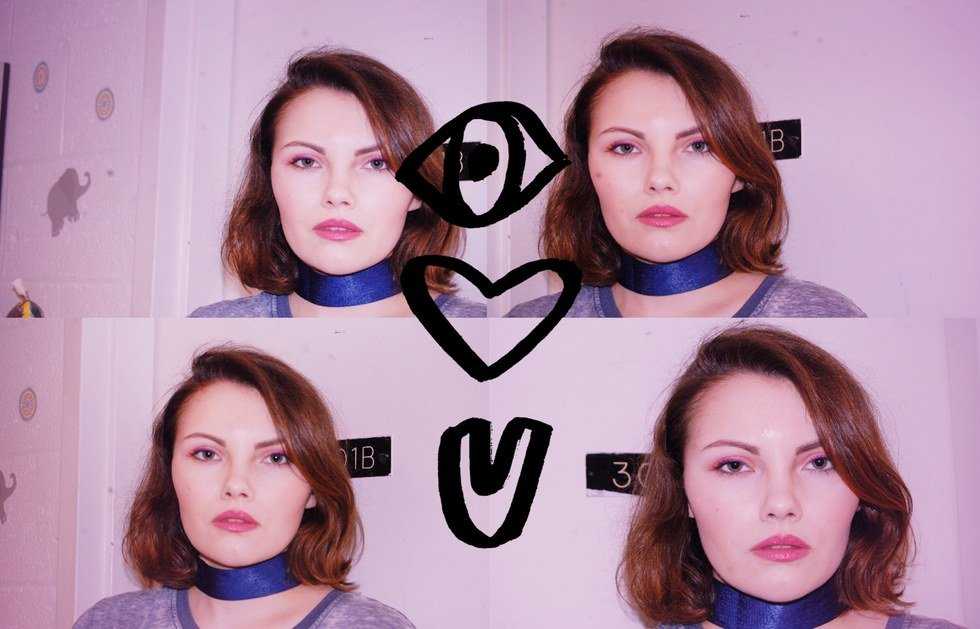
Step 12: The Finished Look

With Valentine’s Day just around the corner, I hope this step-by-step make-up tutorial was helpful and it inspired you to glam up your look. Also, I would like to give a hat tip to my friend, Mari Mullane, for taking the photos for my article this week.