


Despite what many people say, photography is not just one of those things you can pick up and become amazing at. It requires a lot of work, math, and time. There are different rules and ideas that will make a photograph better. I've taken many different classes on photography and sometimes, I still get stuck. Here are some tips for photographers just starting out who want to understand how to make their photography better and understand how to use their camera right.
1. Rule of Thirds

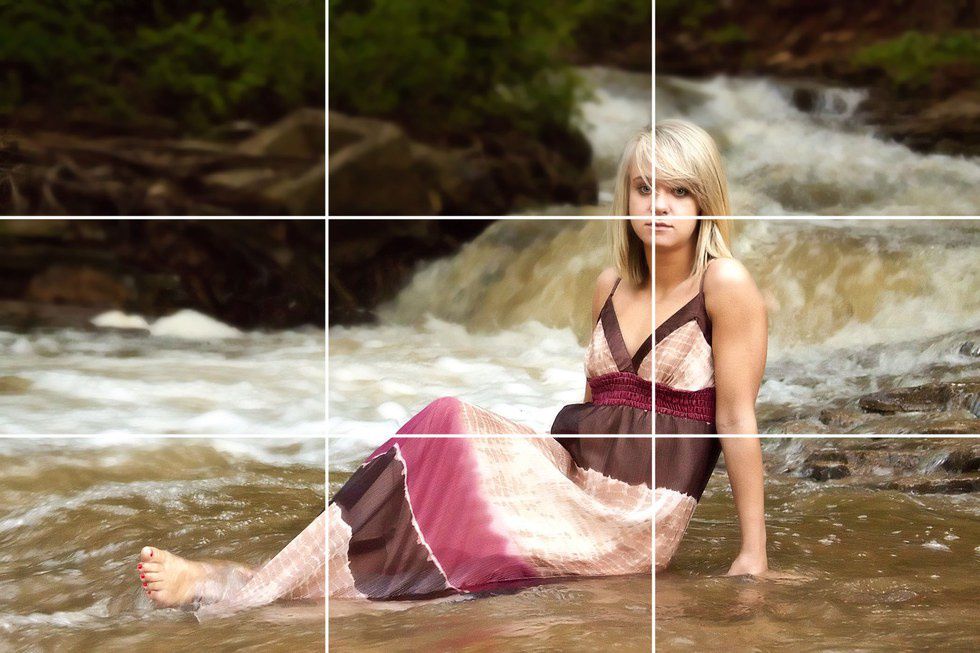
The Rule of Thirds is an idea that most professional photographers follow that pertains to how you arrange the subject of your photograph. What this rule basically tells you to do is to make sure that the subject is falling on one of the points where the grids meet. In the case of a portrait, you would want to make sure that the eye (or nose) is smack dab in the center of one of the third's grid intersection. In the case of this image, the bottle is placed where one of the thirds lines runs straight through the bottle. If this is all a little bit too confusing, your camera probably has an option where you can keep the grid on. Even iPhones have this capability. The reason for this rule is just to set a standard of aesthetically pleasing photographs, and it just helps the eye flow around the photograph easily. The goal is to always follow this rule... It is easier to successfully follow this rule, rather than successfully disobey this rule.
2. Try not to cut anything off
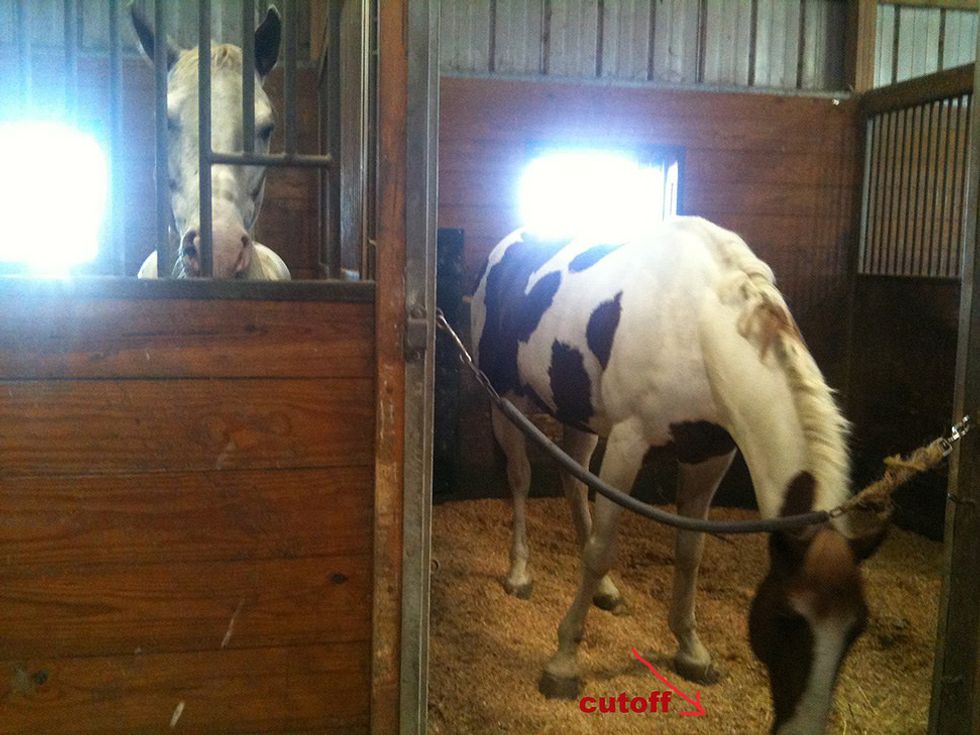
People do it all of the time when taking a photo of someone's body. It bugs me a lot! In my basic photography class, I learned to try not to cut off any signs or things in the composition because sometimes the lines of what is being cut off can lead you out of the photo, when you want you audience to be looking in the photo most of the time. In the photo below, it appears that the horse on the right is the subject of the photograph... And if that is so, why are you cutting off the nose?! It is so essential to have your photos framed/cropped right because cropping and framing alone can make a photograph beautiful. Of course, this rule is also like the rule of thirds and CAN be broken in certain circumstances, but try not to for the time being.
3. Stop using the flash on your camera
Flash can really hurt a photograph, depending on how it is used. Some professional photographers can create amazing photos with flash, but it is very hard to do and should be done later when you have figured everything else out first. The reason why flash is so horrible sometimes is because of the location it is at on your camera. It creates this weird shadow and adds an orb of light somewhere in the photo.. Not to mention the red eye! The ways that you can fix this are to either use external flash, professional lighting, or to "diffuse" the light with a softbox. For now, just use natural lighting.

4. Understand shutter speeds and apertures
If you are really interested in making your photography more amazing, you have to know your apertures and shutter speeds. Your aperture is the amount of light being let into the lens, big or small. Your smallest aperture number reading on your camera probably could be f1.8 or f5.6, and what that means is that you are letting in more light, thus making for a brighter photograph. On the other side of the scale, you have your f16 and f11,etc. which stands for less light being let in, thus making for a darker photograph. This is extremely confusing for apertures but if you just remember that your smaller numbers mean more light, and larger numbers mean less light then you will be okay! Also, The smaller the aperture number, the more likely you will have a slight blur to the background. The larger aperture number will make everything in focus with no slight blur.
Your shutter speed is the amount of time your lens opens it's aperture for light to come in. When you take a photograph of a moving object, you want to stay up in higher numbers like 1/250 of a second. If you are not taking a photograph of a moving object then you can do lower than 1/60. I highly advise not to go below 1/60 if you are holding the camera though, because otherwise things will get blurry.
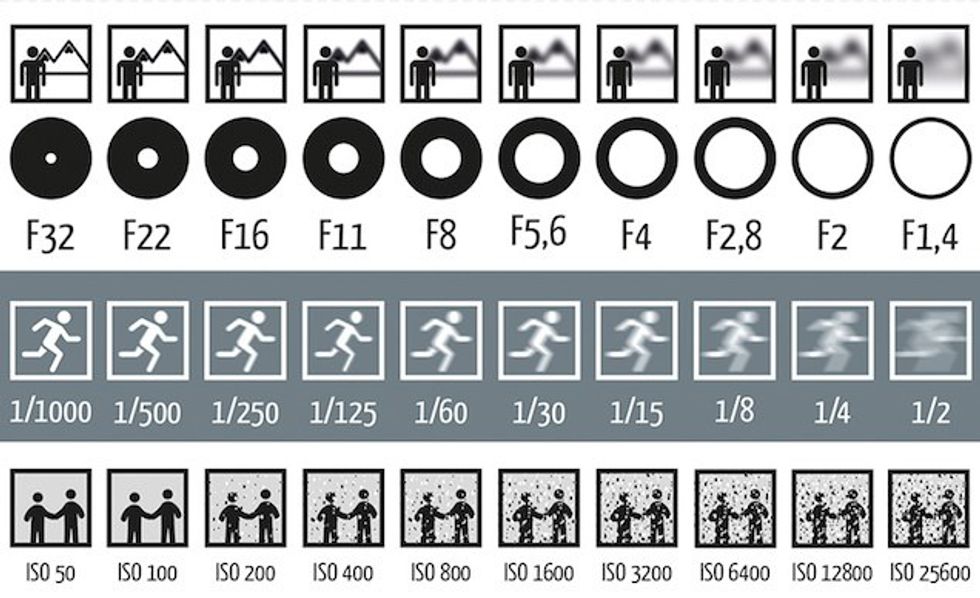
Where your shutter speed and your aperture combine, is on your camera. Switch your camera into manual mode! If I was taking a photograph of a moving object, I could set my camera to 1/250 of a second. If you did want to do this, though, it is important to remember that the higher your shutter speed number, the darker your image will become. If you really want to keep that 1/250, chances are you may have to go to an aperture like f2.8. When moving to a lower number in aperture though, remember that you will have your subject in focus and the background will be more blurred.
5. Know your ISOs
In case you thought you were done with math, think again! Your ISO can range from numbers like 2500 to 100, sometimes higher or lower. ISO actually used to be used more with film cameras because it means the speed of your film. Nikon USA had a perfect example for ISO's:
"The "normal" range of ISO is about 200 to 1600. With today's digital cameras you can sometimes go as low as 50 or as high as 204,800. The number chosen has two important qualities associated with it. First, it sets the amount of light needed for a good exposure. The lower the number, the more light required. The more light that's required, the more likely a slow shutter speed will have to be used. That means low ISOs, like 100 or 200, are most often used in bright situations (like sunlight) or when the camera is mounted on a tripod. If you don't have a lot of light, or need a fast shutter speed, you would probably raise the ISO."- Nikon USA
If I was going outside on a sunny day, I could probably set my ISO on something lower, like 100 or 200. Then, I would probably pick the aperture f16 for a landscape, or f2.8 for a portrait head shot. Next, I would think about the wind. If it was blowing my subjects hair, I would probably want something a little faster than 1/60, so most likely I would pick 1/250. At this point, on a sunny day, with an f16 aperture, my in camera light meter would probably tell me that I'm too bright if I have my shutter speed at 1/60, which is why I may end up going to a higher shutter speed number anyways.
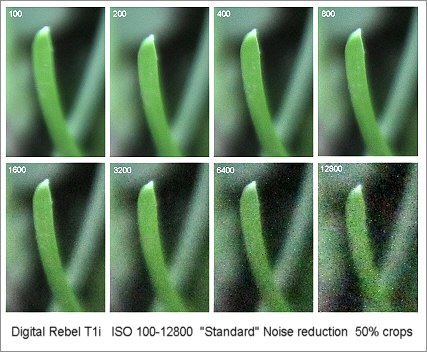
WARNING! The higher your ISO, the more likely you will develop "noise" similar to pixelation.
6. Know what Av and Tv stand for on your dial
Av stands for APERTURE priority. That means that if you set your aperture at f2.8, it will compensate your shutter speed for that aperture. This is really nice if you know you want the same consistent aperture. Beware though, don't get caught off guard in a darker room when your camera slips your shutter speed below 1/60.
Tv stands for shutter priority. Think of this as in "T" for time. This basically does the same thing as Av does, but the other way around. I love this when I'm taking photographs of sports. I just set my camera to 1/500 and just let my camera do everything for me.

The great part about both of these modes, is you are not quite in automatic mode, but you aren't completely independent like manual mode either. It works well when you need to take a quick shot but don't have time to meter everything, without using automatic.
7. Switch to RAW and get Photoshop
There's nothing too wrong with shooting in Jpeg's but you run the risk of your photograph deteriorating as a file over time. Most newer DSLR's will let you choose how big of a Jpeg you want but it still will not compare to RAW's. RAW's will always have all of your information in them, and they are wonderful for when you want to Photoshop something in depth. By the way, get Photoshop. If you aren't quite ready to shoot RAW yet, and you still want to edit without Photoshop, there are websites like Pixlr that I used and loved. There is two options for that website, the Express and the Editor. If you are new to this, use Express first then gradually get into Editor. Just make sure you aren't adding crazy filters, you can ruin a photo that way.


