These days, anyone can hop on to YouTube and watch a tutorial about how to apply your makeup flawlessly; I learned a lot of what I know just by watching videos posted by beauty vloggers. The thing about makeup is that it takes practice. It took me a few years to finally be satisfied with my eyebrow routine and now I can say that my eyebrows are always on fleek. To me, contouring is not as hard as people make it out to be. I actually feel like this process is less work than trying to perfectly wing my eyeliner or even apply false eyelashes.
So, what exactly is contouring?
Contouring is basically just a way to enhance your facial features through the use of makeup. Normally, you use a product (such as, powder, foundation, and concealer, etc.) that is one to two shades darker than your skin tone and apply it to any of your features that you want to give more definition to.
What kind of products do I use?
You can either use a matte shading cream or powder. I’ve been switching back and forth between Anastasia Beverly Hills Contour Kit (Powder) and the NYX Cosmetics Wonder Stick, which is a dual-ended highlighting and contouring stick. Sometimes I also use MAC’s Powder Blush in Harmony. It all falls down to how I feel for the day and how dramatic I want my contour to be.
I’ve seen a lot of girls using basic concealer or even just foundation a shade darker than their normal color. Try out a few products to find which one you like best.
Brushes are important.
If you’re a beginner and you’re using powder, start off using a smaller eye-shadow brush. A lot of makeup artists swear by MAC #217, which is a blending brush with an oval shaped arrangement of fibers. If you’re more confident with your skills, head for an angled brush, such as MAC #159 or one of my favorites, MAC #109. E.L.F also has a lot of great, lower priced brushes if you don’t want to shell out the money for MAC brushes.
If you’re using a cream product, use your fingers to apply the product. Creamy products are best for those new to contouring, as they are easier to work with. Your fingers will warm the product and make it easier to blend seamlessly into your skin.
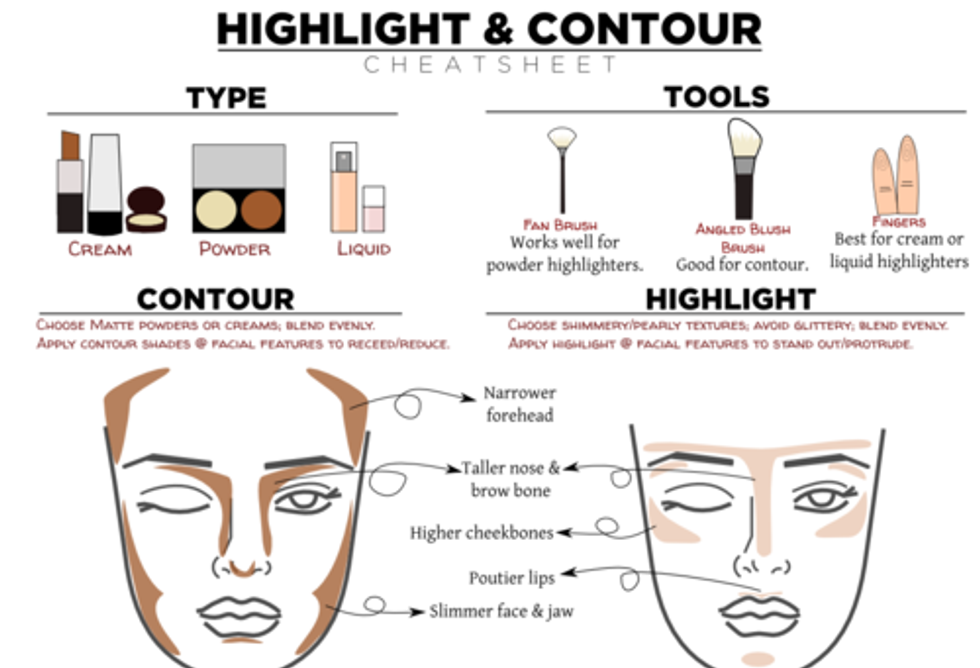
Know where to contour.
Here's a nifty little cheat-sheet. Typically, contouring is reserved for the hollows of the cheeks, the sides of the nose, perimeter of the forehead and the temples. I personally add a little to my jawline just because I have a rounder face. Some people take it further and contour the lips, the eyes or even the chest area.
BLEND!
Blending is of the utmost importance when contouring! Use a damp beauty blender (or egg shaped sponge) or foundation brush to blend out the lines. Personally, I am in love with my beauty blender and I swear by it.
Highlight.
Highlighting brings light back into your face; basically, it draws attention to whichever facial feature you apply product to. Highlighting is important when contouring, but don’t overdo it. Apply product lightly to the top of your cheekbones, down the bridge of your nose, and a little bit on the chin. A fan brush is usually best for this if you're using powder.
Practice.
A lot of girls seem to get really frustrated when trying to work with makeup and more difficult techniques. Have patience. I can promise you that no one got to where they are now without practice. Remember: don’t overdo it on the product. Start off with less and gradually apply more as you see fit. You may feel like a clown the first time, but once you find a technique that works for you, you’ll feel great.
Also, go to YouTube. There are a lot of amazing people on there who show you step by step how to apply your makeup. If you don’t want to spend a ton of money there is always a dupe to a more expensive brand. A lot of beauty vloggers give you comparisons between high-end products and drug-store brands.