


One of the greatest loves of my life is eyeliner, especially winged eyeliner. It never fails to make your eyes pop and take your make up game to the next level. Winged eyeliner is my absolute go-to when it comes to eye make up. Over the years I have perfected the craft of creating a perfect wing. There are six steps you must follow to achieve the winged eyeliner look. Check out my winged eyeliner tutorial below to watch me in action and see my step by step tutorial!
1. Pick up the proper products.
Make sure to pick up liquid eyeliner with a thin, pointed brush. Liquid eyeliner, when dried, does not smear throughout the day and is easier to apply than pencil eyeliner. A thin brush allows you to apply the liner in small parts of your eye and create sharp, detailed, and defined designs such as winged eyeliner.
2. Start at the inner corner.
When lining your eyelid make sure to start at the inner corner of your eye and work your way to the outer part of your eyelid. Follow your natural lash line in order to line your eyelid properly.
3. Mark liner thickness, then color in.
Start creating an extremely thin line at the inner corner to about one third of your eyelid. Then begin to follow that same line, arching your eyelid while leaving a bit of space closest to your eyelashes untouched by eyeliner. After you've lined your entire eyelid, go back and fill in the space closest to your eyelid with eyeliner. By outlining your eyelid first, you are able to mark your eyelid with the thickness you like for your eyeliner. You are then able to go back and fill in the line.
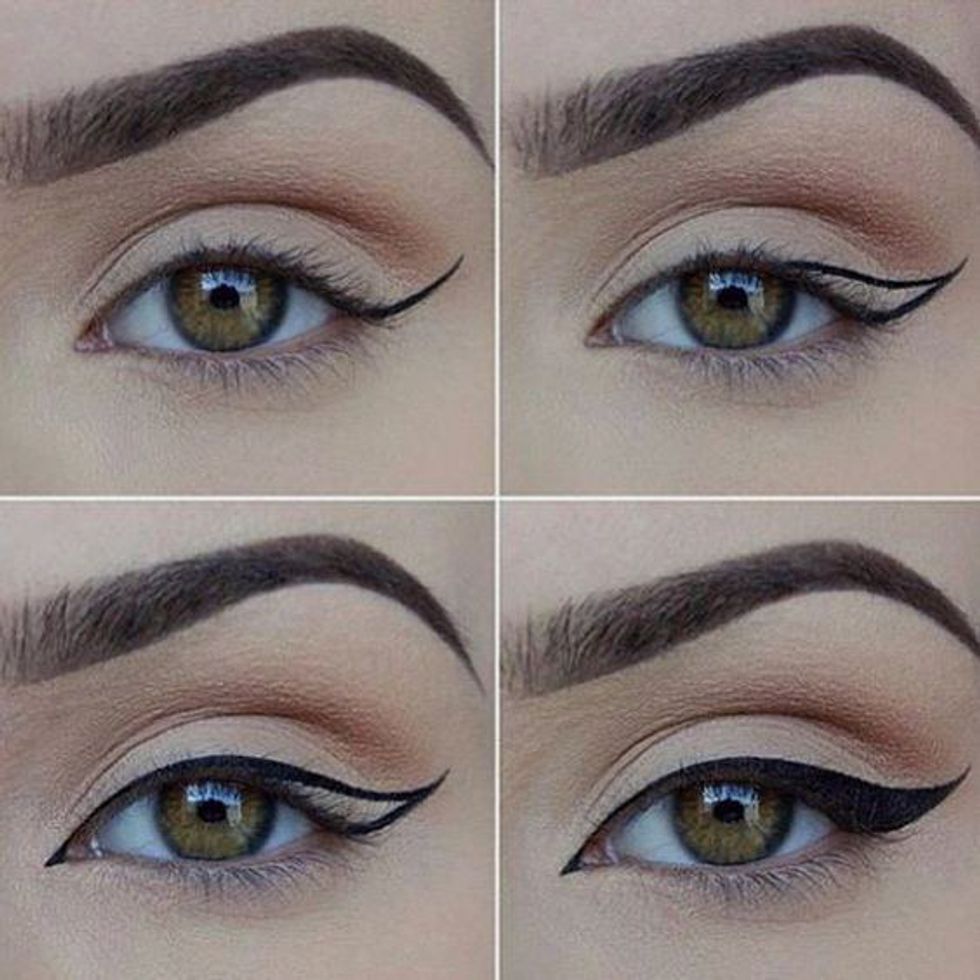
4. Draw two lines out from eyelid forming a wing outline.
Once you have lined your eyelid, draw a line shooting upwards toward your eyebrow from the upper part of your eyelid’s liner. Then draw another line shooting upwards toward you eyebrow from the base of your eyelid’s liner (closest to your eyelashes). Then connect the two lines you have drawn from your eyelid at a point. This creates the outline of the wing. If you want the look to be more dramatic, draw the wing out closer to your eyebrow. If you want the look to be less dramatic, draw the wing closer to your eyelid.
5. Color in wing outline.
Now that you’ve drawn the outline of the wing, go back and fill it in with eyeliner. By outlining the wing first then filling it in, you are able to create the correct size you would like for your wing and enhance accuracy.
6. Shape up to create sharpness.
Once the liner on the eyelid has been connected to your wing and all parts have been filled in, take a little extra eyeliner and shape up any mistakes in order to sharpen your winged eyeliner look!


