Looking for a fun, festive, and classic activity to help you celebrate the holiday season? Look no further! On Thanksgiving, my uncle mentioned how he planned to spend his Friday outdoors, specifically, foraging for greenery in the woods to make his own holiday wreath. Typically, my family would simply buy a wreath from a local store, as many families probably do as well. The idea of creating a wreath from greenery in my own backyard encapsulated me, and I simply had to give it a try. I spent the first half of my day searching for the materials I'd need and later settled in to take on the project while watching Christmas movies and drinking hot chocolate. I thought this DIY project was the perfect way to kick off the holiday season, and thought I'd share the steps I took to create my very own wreath!
*Disclaimer: these plants were foraged from the forest floor; no plants were harmed or ruined!*
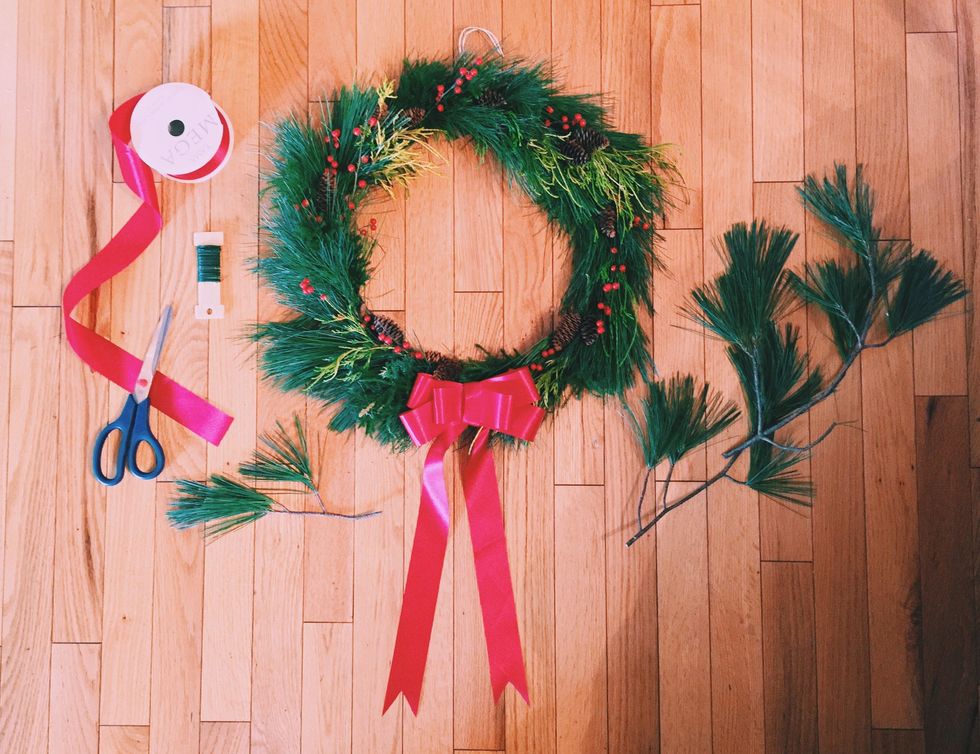
What you'll need:
Two coat hangers, pliable floral wire, scissors, clippers, ribbon (optional), wild berries (optional), pinecones (optional), a hot glue gun or stapler and staples, and whichever greenery you'd like for your wreath!
How To Create Your Wreath:
1. Go into the woods, your backyard, or anywhere you can find greenery for your wreath.
Collect your greenery in a bag. Please do not harm any plants! If you can't find enough on the forest floor and must clip a few pieces from a tree or bush, please do so sparingly and in a way that will not harm the plant detrimentally. The greenery you collect is completely up to you and your liking!
2. Create a circular shape with your two coat hangers to create your frame.
To do so, simply mold the hangers out of their usual shape into circles. Take your wire to bind the two hangers together, one on top of the other facing the same direction. Bind the hangers on the left, right, and bottom parts of the circle.
3. Pick out your favorite greenery that you collected and begin to assemble the design you like.
Arrange the greenery around the coat hangers to see the order you find the most appealing.
4. Use the wire to begin to attach the greenery, using the older, larger pieces of greenery first.
Depending on the greenery you collected, you should have some pieces that are older and larger than the others. These will serve as your base. Clip the pieces you want to use from the rest of the branch/plant, and attach each individual piece from the branch portion to your coat hangers using the pliable wire. Continue doing this until the whole circular hanger frame is covered with greenery. (Make sure each piece is going in the same direction).
5. Once you have your base, begin to attach the other greenery to create more color variation in the design you'd like!
The plants I chose varied in colors; some were a deeper green, others just a different texture with only a slight variation in color, some were tinted yellow. I tried to alternate greenery so as to avoid inconsistencies in shade density; however, you can do whichever you think looks most appealing! Attach the pieces the same way you did before.
6. If you have any berries, clip these from their branches in the size you'd like and attach them to the frame as you did with the other greenery.
I collected winter berries for my wreath. This step is completely optional!
7. Now, take your hot glue gun and your pinecones and begin attaching them where you think they'd look best on the wreath.
Plug in your hot glue gun and wait for the glue to heat up. Once the glue gun is ready, take your pinecones and put a line of glue along the length of the pinecone on one side. Before the glue dries, place the side of the pinecone with the glue on it onto the part of the wreath you'd like it to be on. Continue to do so for the entirety of the wreath to your liking.
The next few steps are to create your own bow, and are completely optional if you bought a bow for your wreath!
8. Take your ribbon and cut four pieces in varying lengths. Cut two short pieces, one medium piece, and one long piece.
There's no specific lengths in terms of inches or centimeters; the length and size you'd like your bow to be is entirely up to you!
9. Take the medium piece of ribbon and lay it flat horizontally.
Take the medium piece of ribbon and lay it flat horizontally. Take each end of the ribbon on the right and left, and bring the pieces in towards the center of the ribbon. Staple or glue these in place. Set aside.
10. Take one of the short piece of ribbon and lat it flat horizontally.
Do the same to this piece of ribbon as you did for the medium piece. Set aside.
11. Take the other short piece of ribbon and set it aside.
This piece will be used to bind the bow together later!
12. Now take the long piece of ribbon and mark the center of the ribbon.
At the center of the ribbon, create an accordion fold by pinching the center in the form of an accordion and stapling or gluing into place. Once done, the right and left sides of the ribbon should hang vertically from the accordion fold. At the end of the hanging right and left sides of the ribbon, take your scissors and make cuts on each sides to create a down facing "V" shape on each portion.
13. Take each piece of your ribbon and connect them to create a bow.
Attach the folded short ribbon to the top of the medium ribbon using your hot glue gun. This will create a bigger bow. Next, take the untouched short ribbon and wrap it around the two pieces vertically. Where the two pieces of the short ribbon meet in the back of the attached short and medium ribbons, glue in place. Finally, take the longest piece of ribbon and glue it to the back bottom portion of the bow. Your bow should be complete!
14. Take your hot glue gun and glue the bow onto the wreath.
Glue the back of the ribbon using the hot glue gun. Before the glue dries, place the bow onto the wreath where you'd like it to be, with the glue side facing the wreath.
And you're done! Your wreath should look something like this:
 Kerry Reynolds
I hope you enjoy your wreath for the holiday season, and that these steps were articulated in an easy to follow manner!
Happy holidays!
- 25 Things To Do Before Dec. 25 ›
- 6 Fun Things To Do In November ›
- 15 Fun Activities To Do Over Winter Break ›